Want to learn some sponging techniques for handmade cards? I thought so! This is why today I am sharing with you two techniques to add color to your handmade cards using sponges.
I will be sharing as well a few tips that will surely make these techniques even easier. But most important you need to promise you will practice them! Cause the more you use these techniques the easier it will be and the happier you will be with the results you get in your cards!
So let’s get started!
Two Sponging Techniques for Handmade Cards
Like I mentioned at the beginning, I will be sharing two techniques for sponging. The first technique will show you how to make a nice cloudy sky with a template and sponging. And the second technique will show you how to mix colors in the background to have a two tone background.
For these cards I used the new stamp set Ridiculously Awesome which have really big bold sentiments that will be great to showcase with the backgrounds I am making with the sponges.
As far as the sponges, you can see in the video tutorial below that I use the circle sponges from Stampin Up! and I cut them in pieces. I also attach a piece of cardstock in the color I want to use to the sponge, that way I know which color I am using for each of the sponges. Typically you can get about 6 pieces from one sponge and the pack comes with 3 round sponges.
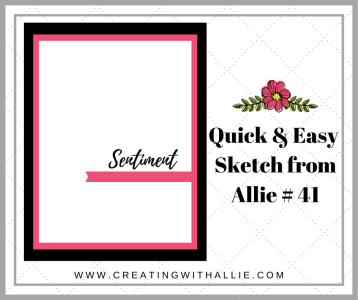
Details and Sketches on these cards
Handmade Card #1
For the fist card I used the following color combo:
I made a cut out using the Happy dies from the “So Much Happy” Bundle and I used it as a template or stencil if you will. that way it will give me the curve edge of the clouds as I was sponging the background. On this post you can see two Birthday Cards using the same technique!
The key thing is to move the template into multiple directions and to sponge or add color right before it crosses the color on another cloud. You can see this in more detail on the video tutorial below.
Also when you are sponging, try to pick up the color from the ink pad with your sponge and then tap a scratch paper with the sponge, to then start sponging the background piece of your handmade card. I would also recommend to do this on a circular motion, and with a light hand, so that the color is smooth.
Practice is your friend!
On thing I forgot to mention is that you can play with the sentiments and add die cut letters, like I did in this case. I love this sentiment the best and I wanted to highlight the word FAITH by adding die cut letters and popping them up with the new foam adhesive sheets! I love how this looks!!
If you are interested in learning how I made this card step by step, make sure you watch the video tutorial below!!
Handmade Card #2
For this second card I use the following color combo:
I decided to use the Dandelion Wishes stamp set for the image in the background, I actually heat embossed it with white emboss powder and then add the color with the sponges. I started first with the lighter color (Pool Party) on top of the embossed image and then apply the daffodil delight.
Similarly as in the previous card you want to pick up the color from the ink pad with your sponge and take some of the color by dabbing the sponge into a scratch paper. After that you can then start applying color to the background of the card in a circular motion and with a light hand, that way you get a smooth layer of color.
Also when applying the second color, you would need to blend the area where both colors meet, that way it will have a nice transition from one to another.
Handmade Card #3
For this last card the color combo I used is the following:
This card is very similar to the last card, where I heat emboss an image from the dandelion wishes stamp set and then add color on top of the emboss image with sponges. However this time I change the sketch and the color combination!!!
I love this technique a lot more as you can play with lots of color combinations, and be even more creative. For instance you can do a monochromatic background just by playing with shades of the same color.. Give it a try and I know you will enjoy it!
So just play with it and make the same cards using different color combos!! would love to see what you create with this technique!
The Video Tutorial
If you want to see step-by-step instructions on how to make these cards, friend! I have you covered!
You can watch the video tutorial below so you can see exactly how I put together these cards, you will get so many tips just from watching it!
The Supply List
You can see below the full list of Items I used to make these cards, if you click on the images below it will take you to my online store where you can purchase any of these items. I truly appreciate your continuous support 🥰
Want to remember this post for later? Save these Easy Encouragement Card ideas in your favorite board!
Hi there, I am super excited with today’s cards that I will be sharing with you how to change your sketches for card making. In this post I am sharing the same card however each one is a step up from the previous one. I know you will enjoy seeing the progression on these cards.
As I have been saying lately, I love using sketches to come up with ideas for my card making projects. It seriously helps me a ton when trying to get into my creative zone! If you want to read more about my process in using sketches make sure you read this post!
And for this post I wanted to share one simple sketch (which you know I LOVE!) and then pair it with using the same supplies and then show you how you can change them a little bit! This process is what brings my creative mojo back every single time!! so lets get started!
You will see that I modified this sketch with every card that I made, but also I used the same elements on all cards so these cards look like a set.
Please note that on this sketch, I added a focal point on the white rectangle of this sketch. For two of the cards this is a bouquet of flowers and for one it is the coordinating designer series paper. So you can see how by changing elements on the focal point you come up with cards that look different, though you are using the same sketch and the same element.
Additionally you will see that the first card is simple, while in the second card I incorporated a fun fold. The last card, though it looks the simplest of the three is actually a pop-up card! So make sure you watch the video tutorial to see this card in action.
The Color Combination
As usual I decided the use the color combination from the designer series paper which is honestly is the easiest way to come up with color combinations.
Next you will see each the cars with some of the details and more information about what changed on the sketch for each of the cards that are shown on this post.
Handmade card # 1
For this fist card, I mainly modify the size of the rectangles, making the focal point smaller than the sketch.
As mentioned before the bouquet of flowers are the main focal point, and I added designer series paper on the background.
For the flowers, I colored them using alcohol markers – stampin’ blends following the same color combination as the the designer series paper. After coloring the flowers, I cut out this image using scissors.
And to embellish this card I added a bow to the base of the bouquet.
Handmade Card # 2
For this second card, I incorporated a fun fold, which as you can see it is an easy one. Same as with the last card I made a bouquet of flowers for the main focal point. I used the same designer series paper and colored the flowers exactly the same way as the previous one.
So when you are using sketches see how you can incorporate to a fun fold, you will see that the card looks totally different just by doing that.
To learn how to make this fun fold make sure you watch the video tutorial on this post.
Handmade card # 3
For this last card, you can see that the card front follows best the sketch, not many changes other than adding a bow. However, the inside of this card is the one that would add the WOW factor as it is a pop up card!
This pop up card is an easy one to make! and you can see I added the same bouquet of flowers as the pop up element.
You can see how to construct this pop up card on the video tutorial below. I promise you will want to make a lot of this type of cards, there are not fancy dies involved, you just need scissors and that is it!
The Video Tutorial
As mentioned before, below is the video tutorial where I will share with you how to color the flowers using alcohol markers, as well as how to make the fun fold and the pop up card! I promise you, both of these cards are extremely easy and you will be able to make them without any problem.
The Supply List
You can see below the full list of Items I used to make these cards, if you click on the images below it will take you to my online store where you can purchase any of these items. I truly appreciate your continuous support 🥰
Want to remember this post for later? Save these Thinking of you card ideas in your favorite board!
Have you been intimidated with the thought of coloring with alcohol markers? if this is you, then keep reading as I will be sharing with you how to color without any fuss.
Also please know that Today I am participating in “The Joy of Sets” blog hop and this month’s theme is Splish Splash, which is great for Summer. So you will get tons of great ideas to get you inspired and hopefully crafting. Please make sure you visit all the blogs participating on this hop. I know you will enjoy! So let’s get started!
Coloring with Alcohol Markers made Easy
Based on our theme I decided to share the cards I made with a beach theme. In this case I used the Seaside Notions stamp set from Stampin’ Up! for the cards you see below!
So let’s start talking about how to color with alcohol markers! But first things first, we need to go over a few things you need to have handy.
A line image stamp, like the one I show for these cards
Memento Ink
Alcohol Markers – in my case I used Stampin’ Blends from Stampin’ Up!
Good Quality of White Card stock – I recommend the Whisper White from Stampin’ Up!
NOTE – Please note that you want to have two shades of the colors you pick for your alcohol markers, this is so that you can make some shading or blending with them. Below the list of colors I used in my cards.
Petal Pink (light/dark)
Calypso Coral (light/dark)
Crumb Cake (light/dark)
Soft Suede (light/dark)
Pool Party (light/dark)
Bermuda Bay (light)
As you can see not only did I picked the light and dark shades of the Stampin’ blends, but also another color that would be in the same type of color family. In this case Petal Pink with Calypso Coral, Crumb Cake with Soft Suede, and finally Pool Party with Bermuda Bay. This will allow you to get even more dept in your color, as you will see on the video tutorial that I share later on in this post.
Process to Color with Alcohol Markers
So here is the process to color with alcohol markers, when you follow these steps you will see how easy this gets. Please know that the more you practice the easier it gets! I promise you give it a try and you will see how you will be improving with each piece that you color.
Also at the beginning of your coloring journey you might want to do some samples to see which colors look great together, and if you like the color combinations, that way you will start building an eye for colors and color combos. You will get that savvy-ness to know exactly how things will look like, even before you color your images 😉
Step by Step Process
Stamp the image using Memento Ink – This is super important – since you are using alcohol markers you want to use a water base ink pad, other wise when you start coloring you will smudge or pull the black color from the image into your coloring.
Add a light hand of color to the image using the light shade of the alcohol markers. DO NOT saturate the image, this is a light hand of color – in the images I am showing today, the image is in one color, however there are images that have sections that you might want in different colors, so you would follow these steps for each section of your image.
Add darker lines with the darker alcohol marker in areas where you want to accentuate color, or add a shadow. You could use the lines on your stamped image or you can add your own. For the images in these cards, I followed the lines of the stamp itself to add darker highlights. However, you could also follow my simple rule of seeing what is on top of something in the image and then add color to the thing that is under.
Go back with the lighter alcohol maker and in a circular motion start to blend the darker line with the lighter color, so it looks like a gradient going from light to dark. I would recommend to do the blending towards the middle of the image and avoid over saturating the edge of the images, as this could lead to some bleeding, meaning color moving outside the lines.
Once you are done blending, see if the image looks like you wanted, if you need to add a bit more of the dark color you can repeat steps 3 and 4 until your image looks how you wanted it.
Also remember it is always better to go from light to dark as you can add more color. However, it is harder if you want to remove the color.
Thinking of you card #1
Following the steps I shared above, I colored the sea horse with Calypso Coral, the shell with the star with Crumb Cake and the larger shell with Petal Pink.
You could add little of the Calypso Coral (light shade) to the larger shell to add a bit more of color.
I cut the images and glued them down onto the stamped circle that I used for the background of these images.
Thinking of you card #2
For this second card I followed as well the same process for coloring with alcohol markers.
I colored the sea horse with Pool Party and then added the light shade of the Bermuda Bay to make it a bit darker.
Then I colored the shell with the star with Crumb Cake, And the other shells with the Crumb cake but I added Soft Suede to make them a bit darker and make them look different. Make sure you watch the video tutorial to see how to color with multiple shades.
And if you are wondering about the background, I used watercolor to add the blue-ish color. The paper has to be watercolor paper to have this effect, you just color the background and then once it dries, you add some droplets of water and dry it with a paper towel so it removes the color on the areas where the water was.
The Video Tutorial
Here is the video tutorial where I show you step by step how to make these cards. On this video I show you how I colored all the images using the process I described above.
Finally as I mentioned at the beginning, this post is part of a blog hop. You can go to next the blog post by clicking on the image below. I know you will enjoy the projects shown in this blog hop!
Want to remember this post for later? Save these easy Thinking of You card ideas in your favorite board!
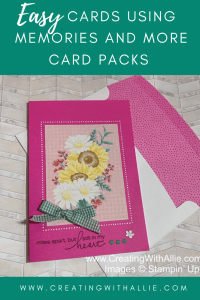
Let me share with you how to make easy cards using Memories and More sets!! If you ever have been running around only to find out that you need a card and are in a time crunch, then make sure you check this post!
Also today I am participating in the blog hop with the amazing Stampin Around the World team! All the ladies participating in this hop are very talented. So make sure you stop by all the blogs participating. I know you will love seeing all their designs! So lets get started!
Easy Cards using Memories and More sets!!
As I was mentioning before, making cards can be super easy when you use the cards that come in the Memories and More sets. If you don’t know what I am talking about, these are the inserts that you use for pocket scrapbooking. These packs come with 6″ x 4″ and 4″ x 3″ cards, so you can easily adapt to your card making projects.
And when you pair these packs with the coordinating card base sets you will see that the process gets even easier. Stampin’ Up! has released new card bases which are large enough to fit these cards.
Below you will see both the card pack and the cards and envelope set.
You can see that both of these products coordinate beautifully, and they feature the brand NEW in-colors!!
Misty Moonlight
Magenta Madness
Just Jade
Cinnamon Cider
Bumblebee
Card samples
In this section I will be sharing with you how to put together different cards using a few embellishments and the card bases as well as the inserts from the Memories and More Collection.
Memories and More Card #1
As you can see in this card I used the Magenta Madness card and envelope paired with one of the smaller cards.
The smaller card fits perfectly in the white polka dot rectangle printed on the card base.
I then added Wink of Stella on the flowers and then added a bow to highlight the card. I also stamped the sentiment and added the enamel dots and added a small flower sticker, which comes in the card pack as well.
So you can see how easy it is to put the card.
Memories and More Card # 2
For this card I use the card base and envelope in Cinnamon Cider, and I paired it with one of the larger cards.
I loved that the cards color coordinate really nice with the in-color card base.
In this card I decided to add labels from the Tasteful labels dies and a banner under them to pop the bumble bee (yellow) flowers on the card
If you noticed I added the sentiment on the top label as well as a flower from the Lovely You stamp set.
And to finish off this card I added Wink of Stella on some of the shadows of the flowers, and added a bow with the Cinnamon Cider ribbon.
Memories and More Card #3
And here is my final card. This one as well uses a small card that coordinates beautifully with the Just Jade card base and envelope.
For this card I added a sentiment that I stamped on Misty Moonlight card stock.
Similar to the other cards, I added Wink of Stella on some of the flowers, to add a shimmery look on them
And to finish this card, I added a a bow using the Misty Moonlight ribbon to the bouquet of flowers.
So hopefully I have sparked your creativity and help you realize that making cards with these sets is extremely easy. As you can see the stamping is very simple, and you just need to add a few embellishments to the card to make it pop!.
The Blog Hop Line Up
As I mentioned before, make sure you visit all the blogs participating in this blog hop, I know you will enjoy seeing all he projects and I am sure you will get lots of inspiration! You can see below the line up!
The Supply List
You can see below the full list of Items I used to make these cards, if you click on the images below it will take you to my online store where you can purchase any of these items. I truly appreciate your continuous support 🥰
Want to remember this post for later? Save these Easy-to-make card ideas in your favorite board!
Do you ever wonder how to come up with card ideas easy? or do you ever feel stuck and don’t know what to make when you go in your craft room? If this is you, then continue reading as today I will be sharing with you a few tips to get your creative juices going.
How to Come Up with Card Ideas Easy
If you have been following for a while you might have noticed that I try to make cards using the same supplies, and this is no mistake.. I always find that when working with a set of products this helps me focus and get more creative.
So today I want to share with you my easy process to come up with card ideas every single time!
The Process
In this section I will give you step-by-step instructions on how do I come up with card ideas every single time, follow this process and you will see that card making gets easier and easier as you practice.
Select a set of products you want to work with.
Pick colors that go with the products you selected.
Choose easy to follow sketches
Pair all the elements you chose by putting them together and see which ones you like better
Make cards using the elements you liked best from the step 4
The cards I show above I followed the process I outlined above, so let me share with you a few tips.
The Process in Action!
Here I will take you step by step on how I used the process above to make sure you see how this helps you when you are making cards.
Choosing the products to use
When I picked the products I wanted to use, I tried to stick to products that coordinate. This is even easier if you pick a suite from Stampin’ Up! And the reason is because then everything truly coordinates, the colors on the patterned paper will coordinate with the embellishments in the suite, with the card stock and the ink pads, and the images and die cuts will also coordinate beautifully with the patterned paper. In this case I used the Forever Fern Suite from Stampin’ Up!
The Color Combination
Because I use a suite, most likely there is a color combination that goes with it. So for instance in the Forever Fern Suite the color combination is this:
Shaded Spruce
Soft Sea foam
Pear Pizzas
Just Jade
Garden Green
Pretty Peacock
Gold
Whisper White
If you ever wonder what color are included in a suite, you can refer to the back of the patterned paper a.k.a. designer series paper or DSP and it spells out which colors are included.
You can pick all the colors on the paper, or just the ones that are included in the sheet you want to use. Additionally you can put sheets of card stock together and see which colors you want to use as your main color and which color you want to use for highlights.
In the cards I made you can see that Soft Sea Foam and Shaded Spruce are the main colors while all other greens are just highlights to enhance the desigs.
The Sketches
Once I have picked the colors and selected which ones are going to be the main colors and the highlights then I go ahead and look for sketches. Please note that it is easier to start with simpler sketches than the ones that have too many layers. Trust me! even when you feel the sketch is way too simple, you will see that your card turns out amazing!
If you notice my sketches and my cards, you can see that the basic elements are there. I try to build from the basic elements up. So in this case, none of the sketches have leaves, and that is ok! as I can use these sketches over and over for other suites, and with other techniques.. 😉
Sketch and Card #1
For this card you can see I have the circle, the bow and three sections on the card front. I used the gold as and accent color (or highlight) as well as the garden green, pretty peacock and pear pizzas.
You can see that while I changed from a basic circle to another fun die cut that has the shape of a circle but it adds a bit of personality. Also while this sketch does not call for leaves you can see that I added them to the left and the circle where the bow is and they look really nice.
This is why I strongly recommend going with simpler sketches as you can always incorporate the elements from your products you want to use.
If the sketch is too specific sometimes it bias your mind and do not want to add anything else that is not what the sketch calls for. 😉
I also want you to realize that any of the layers you see in a sketch can be changed to stamped background, patterned paper, or embossed background, so this opens a lot of possibilities as well. In this card the main part of the card base was stamped and embossed to add texture to the card.
Sketch and Card #2
this second card you can see that the banner is actually made with patterned paper, and the background was as well stamped and embossed. So you can see how you can be changing the elements that you see on the sketch. Same as in the previous sketch the leaves were not called for, however I added them where the circle is.
You could also stamp the circle rather than adding the leaves, however I would not stamp then the background. So always play with elements and see how you can change things to get different looks. I think you will enjoy doing this! In fact I think this is a great challenge to come with as many looks from one single sketch!
Sketch and Card #3
On this last card you can see how you can change the pieces with embossed paper and designer series paper following the sketch. I honestly like doing that all the time, as I mentioned before, this always helps you to come up with multiple ideas.
And similarly as with the other cards you can see that though the sketch did not call for the leaves I added them to the circle area and it looks good.
I really hope that this process has helped you see how to come up with card ideas in an easy way. I promise you the more you practice this and put in action these steps the easier it will get to make cards every single time.
The Video Tutorial
Below you will see the Video Tutorial where I show you step by step how to make these cards, that way if you want to see exactly how I made them you can do so in this video.
I also go over the measurements for each of the cards as I am making the cards. Enjoy!
The Supply List
You can see below the full list of Items I used to make these cards, if you click on the images below it will take you to my online store where you can purchase any of these items. I truly appreciate your continuous support 🥰
Want to remember this post for later? Save these friendship card ideas in your favorite board!
Today I wanna share with you an easy watercolor technique for handmade cards. I know you’ve seen beautiful cards that look like little pieces of art and you might be thinking it is super hard to make. However, I am here to show you that you can color like the pros following the tips I am giving you on this post and on the video tutorial below!
Watercolor technique for handmade cards
The following encouragement handmade cards showcase the Artfully Aware stamp set from Stampin’ Up! This is a great stamp set with line images, which are perfect for a lot of techniques, but in particular for watercoloring with ink pads.
You will see on the video tutorial below how easy it is to watercolor with Aqua painters and ink pads. Make sure you keep reading as I am sharing with you a few tips to make sure you get the best results when watercoloring.
Watercolor Tips
Make sure you use watercolor paper – this is key as you will see that the color flows better and it will not peel your paper as you color your images
Use Stazon ink as it will prevent the image lines from smudging when applying color
Stamp using a stamp position tool like the stamparatus, so that you can stamp over and over multiple times to get a crispier image. This is key to get a nice image, as the watercolor paper is thicker and with texture, so when you are stamping on it, sometimes the image is not as clear.
Play with the amount of water you apply on your Aqua painter on a scratch watercolor paper, so that you can see how the color looks and get more confident on the look you want to get. The more water you apply the lighter the color will be, the less water the richer the color will be.
Let dry the image before applying another layer of color. This will help you with shadowing when coloring.
Clean your Aqua painter in between colors, so that you don’t mixed colors
Card Sketches and Other Details
On this section you will see the sketches I used to come up with these cards, as well well as the color combo and other details.
If this is the first time you are visiting my blog please know that I love using sketches, as I really think that they make the card making process so much easier. I feel like these are recipes you can follow with any products you already have.
That said, let me share with you a few tips when selecting the sketches to play.
Try to pick sketches that are simple and with fewer layers – this always helps a lot, specially at the beginning as it is easy to visualize when substituting the elements of the sketch with the paper you are using.
Pick a color combo and select which colors will be the main color and which ones are the highlights – this will help you identifying how to add the colors into the sketch you are using.
Add embellishments even when the sketch does not call for it
Modify the sketch as you want, for instance, you can change the shapes of the elements on your card, instead of a circle you can add a square or and oval or a flower.
The color Combo
As usual I followed the colors in the designer series paper that I chose. This is something that never fails for color combination. Try it and you will see that you cannot go wrong when you follow the colors you see in the patterned paper you are using.
Soft Suede
Mint Macaroon
Calypso Coral / Terracotta Tile
Whisper White
Handmade card #1
As I mentioned before, below you will find the video tutorial for these cards where you will find all the measurements as well as how to watercolor step by step. I think you will enjoy watching the video better than me trying to explain what I did to color it.
Make sure you want the video, since all these cards use the same watercolored image, so you want to see how this is colored.
The sketch is very simple and straight forward, the only thing that I added was an extra ribbon wrapped around the card to add and extra detail that would coordinate with the bow.
Handmade Card #2
This second card is very simple as well. The biggest trick on this one was to get two patterns that coordinate nicely together, and honestly this was the part that took me the longest when planning this card. This is to say that this card is extremely easy to make.
Try to water color all images at once, so that you can put together the cards even quicker. You will see in the video that this is what I did. That way the rest of the card making process goes even faster.
Handmade Card #3
This final card is even simpler in sketch, however, I love how it looks. I think that this is the magic when making cards. Make them easy but have an amazing look. don’t you think?
One last comment I have not mentioned, use the tailored tag punch to make the banner ends on the sentiments. This has become the punch that I use the most because of how it is used for banners in sentiments. Make sure you watch how to do this on the video.
The Video Tutorial
And here it is!! I know I have been referencing to this Video Tutorial thru out the whole post, but believe me, you want to watch it to see how easy it is to watercolor stamped images using aqua painters and ink pads.
On this video I will share the measurements as well, so if you want to recreate the cards you can follow along the video 🙂
Also note that the video is longer because I show you how to make all cards on this video, so watch it when you are not in a hurry 😉
The supply List
If you are wondering what products I used and where you can purchase them, I have you covered my friend 😉 as below you will see the full supply list with the links to all the products. And if you click on any of the images, it will take you to my online store so you can get any of these products.
I truly appreciate your support when you purchase your Stampin’ Up! supplies thru me 🥰 Also if you have any quesitons about these products, don’t hesitate in contacting me to help you 🙂
Want to remember this post for later? Save these friendship handmade card ideas in your favorite board!
Receive FREE tutorials to make 5 cards when you sign up!
You have Successfully Subscribed!
Subscribe
Get my new posts in your inbox!
Current Catalogs
Archives
Categories
Disclaimer
The content in this blog is the sole responsibility of Alejandra Gomez as a Stampin’ Up!® Independent Demonstrator. The use of and content of classes, services or products offered is not endorsed by Stampin’ Up!


 As you can see in this card I used the Magenta Madness card and envelope paired with one of the smaller cards.
  For this card I use the card base and envelope in Cinnamon Cider, and I paired it with one of the larger cards.
 And here is my final card. This one as well uses a small card that coordinates beautifully with the Just Jade card base and envelope.