Here is the latest Online Card Class, where I showcased projects using the Just my type Stamp set, which is super fun to play with!
Because this particular set is not part of a suite, I decided to paired it with the Delightfully Eclectic designer series paper (DSP), I loved the different patterns in this DSP and I think you can get lots of different card ideas with this paper pack alone.
You can check below the different cards with this duo of products!
You can check the key items in this card class in the links below
For the color combination I decided to go with the colors in the paper pack, so I looked in the patterns I wanted to use and then select a color combo.
As mentioned above, this pack so many options in patterns that I actually ended up with three different color combos!
If you ever struggle with coming up with color combo ideas try using your DSP as inspiration. This always help me when designing my cards, so give it a try!
Just my Type Card Class Close Up
Below you will see a close up look of the cards I made in this class. I really loved how well the Delightfully Eclectic DSP worked with the “Just my type” stamp set.
Video Tutorial for this Online Card Class
If you want to learn how to make these cards step by step, then check the video tutorial below. I go over measurements as well as my process when making cards.
The Supply List
You can see below the full list of Items I used to make these cards, if you click on the images below it will take you to my online store where you can purchase any of these items. I truly appreciate your continuous support 🥰
Want to remember this post for later? Save these Fun & Eclectic Cards featuring the Just my Type Stamp set in your favorite board!
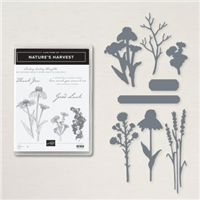
Hi there! Today I want to share an easy Thinking of you card that you can make using the Nature Harvest Bundle from Stampin’ Up!.
This is a new bundle that has beautiful flowers images as well as dies. The dies are particularly amazing as this set has images that can be used as stand along dies. Which means, the die cuts can be used as the embellishments for your cards.
This die set design is very similar to the Quite Meadow Bundle.
You can use this die set to create fun cards mixing the images in the stamp set with the dies cuts like this one. And what is even better is that this type of die set can be used for so many techniques. In fact I actually created a card class around the techniques, just because I know the potential on these dies! You can check it out here to learn more.
Also please know that today’s post is part of an amazing blog hop where we are going to be sharing with you projects to keep you crafting, our hope is to inspire you and to keep you crafting, so make sure you check below the full line up of participants and visit their blogs.
But let’s talk about the card I want to share with you today!
Thinking of You Card
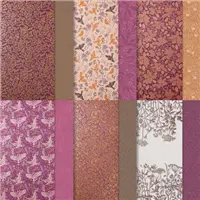
For the card today, I paired the Nature’s Harvest Stamp set with the Blackberry Beauty Designer Series Paper (DSP) a.k.a. patterned paper, mainly because I love the colors in it! check both of these products below!
I love purples and rich fall colors and this paper pack has the perfect mix of colors for fall with some hints of Purple (Blackberry Bliss / Rich Razzleberry).
By the way, did you know that during saleabration you can get this bundle for FREE? Yes, you are reading that right! FREE!! During August and September, when you purchase the starter kit you get a FREE bundle from a selected list, and the Nature’s Harvest is one of those bundles. If you are interested in learning more about the starter kit, I have added a section below!
So here is my card, what do you think? Do you like it?
Color Combination
Since I love the color combination on the DSP, I definitely used it as my inspiration! See below!
I find that this is the easiest way to get the color combos for my cards, so give it a try! Pick a sheet on a paper pack and pull the colors from it to get your color combinations. You will see this is super easy, and your cards will look perfectly color coordinated every single time!
Thinking of You Card Details & Sketch
This time I actually got the full card idea from a fellow demonstrator Julie Davidson who showed a card like this in a video, but using a different color combination and the Nature’s Meadow DSP. I fell in love with the card and wanted to make my version of it!
I created the sketch to help me remember the card and from there I just changed colors and added a few embellishments.
Here is the sketch if you want to save it for future reference. I love using sketches for my cards, and I am sure I will be using this sketch again soon!
As far as coloring, I stamped the image of the flowers using the blackberry bliss and then color the image using the stampin’ blends a.k.a. alcohol markers. This is one of my favorite ways to color, cause you can blend the colors so you dont get the strokes of your coloring in the image! It always looks really vibrant and perfect!
For this card I colored the flowers using dark daffodil delight for the centers, and Rich Razzleberry (both light and dark) for the petals. And for the stems I used Cinnamon Cider both shades as well.
The sentiment was stamped in blackberry bliss onto Cinnamon Cider and cut it out with the dies from this bundle.
And the panel where I put the flowers was embossed using the Timeworn 3D embossing folder. This adds a really cool dimension and texture, giving it a lot of interest. Don’t you think?
The Best Deal is even Better!
As mentioned above, during Saleabration we have a special promotion going on, where you get a FREE bundle of your choice from a selected list when you get the starter kit!
You might be wondering what is the starter kit? Well my friend, let me explain just a bit..
The starter kit is the best deal we always have! You pick $125 worth of products, but only pay $99 + tax, NO Shipping (which is another 10% discount) and during saleabration you get an additional bundle of your choice from a selected list of bundle which range in price from $35 to $60. So you can see how you are really getting a lot more of value of an already great deal..
Once you get the starter kit, you become a Discount Shopper, which means you get at least 20% discount on all your subsequent orders, and you keep this discount for as long as you are active. There are no penalties if you ever drop. So there is nothing to lose.
Please know that you don’t have to hold events, sell anything or make this a business, though the option is always there if you ever want to pursue that path. We have lots of opportunities and training in our team, if you are curious and want to go that way.
When you join my team, you will be part of a larger team called the Stamp Therapist where we have the following perks:
Monthly team gatherings with stamping (online for now). Yes! We have active team members all across the US!
Free tutorials
Fun creative challenges
Prizes
Exclusive Facebook group
Incentives
Business training if you wish
…and much more!
If you have any questions, you can contact me at allie@creatingwithallie.com.
As mentioned at the beginning, this post is part of an awesome blog hop, where fellow demonstrators around the world will be sharing projects to inspire you this Sunday, so check it out!!
Below is the full line up! Visit all the blogs participating, and I am sure you will get lots of ideas for your next crafting project.
The Supply List
You can see below the full list of Items I used to make these cards, if you click on the images below it will take you to my online store where you can purchase any of these items. I truly appreciate your continuous support 🥰
Ever wondered how to use an Sketch for Card making? if so, keep reading as I will be sharing with you how to use sketches!
But before I start, let me tell you that this post is part of a blog hop, where fellow demonstrators will be sharing card ideas using the same sketch. So you will get lots and lots of ideas of how everyone used the sketch for their card!
So let’s get started!
Benefits of an Sketch in Card Making
If you ever struggled getting creative or coming up with card ideas, I would suggest you use sketches.
Sketches are the easiest way to come up with card ideas, as you just need to pick a sketch and a set of products to start playing with them. It honestly seems like the creative process flows so much easier. I use sketches every time I need to design for my card classes or my Facebook lives mainly because it helps me design my cards so much faster.
Once you start using sketches you will realize that these are like maps that give you a visual idea of how the elements will work in the card. You would just need to substitute each of this elements with your crafting supplies. Which is what I will be talking next..
How to Use an Sketch for Card Making?
If you have never use an sketch, here are a few things to consider:
Select an easy sketch, the less elements the better it is, as it gives you more possibilities
Pick a few products you want to use, so you don’t overwhelm yourself
Decide if you want to use the sketch as is or if you want change things around
Start substituting the elements with the products you selected so you get the idea of how your card is turning out
Do not put any adhesive in the elements, just position them and change them around until you are happy with the visual of your card
Have fun!
The Sketch for this challenge
Below you can see the sketch that was given for this challenge.
You can see is simple, and it does not have too many elements, so this sketch is perfect to use as it is easy to change things around or modify as you need for the products you want to use. In my case you will see I change the shape of the elements but still follow the essence of the sketch.
Thank You Card
Since this week I was working on Thank you cards for the sweet ladies supporting my business by placing orders during this month, I decided to use this sketch for one of their cards. I paired it with the products from the You’re a Peach suite, as this suite is one of my favorites and I have been playing with it a lot lately!
If you want to see more examples with the You’re a Peach Suite, you can read this post where I shared three more cards!
But I digressed…
Below you can see my interpretation of the sketch!
As you can see I changed the shape of the elements. Instead of using squares, I used circles, and honestly, you could changed to any shape you want. Also for my sentiment I decided to use a banner rather than stamping directly on the white cardstock, and I added a bow with the twine rather than just wrapping it around..
See how simple are my changes? Try it and see how easy this is 🙂
Color Combination
For this card I decided to use the colors featured in the You’re a Peach Suite.
I love how all the colors compliment each other and I think this is why I have been using this paper pack so much.. I just love the color combinations you can get out of this paper pack.
If you are interested in watching how to stamp the peach and get the two tone, make sure you watch the video tutorial on this post, where I show this stamping technique.
Additionally if you are interested in knowing which products I used for my card, you can see below the full supply list. You can click at the images which will take you to my online store where you can purchase any of these items. 😊
Want More Card Ideas?
If you love the You’re a Peach Suite as much as I do, then consider getting my card class tutorial.
As mentioned above this post is part of an amazing blog hop, so make sure you visit all participating blogs to see all the different cards using the same sketch!
I know you will love seeing all the interpretations from my fellow demonstrators.
Below is the full list of the participants.
The Supply List
You can see below the full list of Items I used to make these cards, if you click on the images below it will take you to my online store where you can purchase any of these items. I truly appreciate your continuous support 🥰
Want to remember this post for later? Save this Thank You Card Idea in your favorite board!
Would you want to get a fun Birthday card idea to make? I thought so! Which is why I decided to share with you a birthday card using the Ice Cream Corner Suite from Stampin’ Up!
And what is even better, is that today’s blog hop theme is projects using this very same suite! So if you are loving this suite then, make sure you visit all the blogs participating in this blog hop, cause I know you will enjoy seeing all the projects using this suite.
I promise you, you will get lots of ideas and inspiration that will put you in crafting mode right away! so stick with us 😁
Fun Birthday Card Idea to make
When I saw the Ice Cream Corner Suite I really thought of fun Birthday Card ideas!!! I mean it has ice creams and icicles which I could see as treats during birthday parties right??
So with that in mind, I decided to use it for a Fun Birthday Card.. You can see below the picture of my project.
Color Combination
As always I used the designer series paper (DSP) to get the color combo for my project and of course, when I saw this collection had Purple Posy in it, I decided to go for that color!
I love Purple, so there was no way, I was not going to use Purples in my card, if the DSP has it! right?
Using the Designer series paper for the color combos is always the easiest way to do it, and when you use Stampin’ Up! products making cards or any paper crafting project for that matter becomes so easy as well.. Since all their products color coordinate, you just need to pull all your supplies in this colors and you instantly get creative..
And you can do this for any of the sheets, in this case I created a second Birthday Card using this same suite.. See below..
You can see that in this second card I used again the DSP as inspiration for the color combo.. below you can see this color combo.
And as you can see, I just used a twine in the Blushing Bride, and cardstock in Calypso Coral, Bumblebee, and Blushing Bride, and the card looks all coordinated. I am telling you, this is super easy to do!
The Sketch & Other Details
Every time I make cards, I try to pick the DSP I want use and then select the color combo. Once I have that I just pull out all the supplies in these colors, like cardstock, ribbon, gems, etc.. and from there, I go and pick a sketch or sketches to use..
And this time was not different!
I love using sketches, as they always helps me get into my creative zone in no time!
So for these cards, I am sharing the one sketch, and how you can change the direction.. so that you can see that any sketch can be flipped horizontal or vertical and get you a new fresh look.
Also notice how I also changed the position of the elements, so always feel free to change the elements and the shapes.
Tips for Sketches
A few tips to share with you when playing with Skethes
Always start with simple sketches – these are easier to modify and change, offering even more possibilities
Change the texture or materials of the layers, you could use plain or embossed cardstock, designer series paper, specialty papers
Change the shapes of the elements – Any time you see a circle for example you can sub it for another shape like ovals, or squares, or any other label shape. You could even use a stamped image shape.. the possibilities are endless
You can add multiples of an element, for instance instead of one banner, you can add two
See what you can do with the backgrounds – you can make a fun technique with it or shift the layers like I did in both of my cards today
Hope his list gives you ideas of what you can do with a simple sketch and even better, I hope you start using them whenever you feel stuck not knowing where to start when you are making cards
The Video Tutorial
As usual you can see the video tutorial where I shared step by step how to make the Purple Posy Card I am showing in this post. I go over measurements and all other details.. so I hope you enjoy it.
Also if you want to get any of the items I am sharing today, please scroll down where the supply list is. I have listed all the products in this post so just click on the images and these will take you to my online store where you can get any of these items..
I really appreciate your support!
Ok my friend, hope you have enjoy the cards I shared today with you.. share with me in the comments which card what your favorite?? and if you have tried sketches, let me know how are you liking using the sketches?
The Blog hop line up
Make sure you hop around with us as you see more ideas using this cute bundle! I know you are going to love all the projects and will get so many ideas and inspiration!
below is the full line up of participants on this blog hop!
The Supply List
You can see below the full list of Items I used to make these cards, if you click on the images below it will take you to my online store where you can purchase any of these items. I truly appreciate your continuous support 🥰
Want to remember this post for later? Save these Birthday Handmade Card Ideas in your favorite board!
Today I want to share how you can make a beautiful Handmade Birthday Card with the Butterfly Bouquet.
But first, let me tell you that this post is part of a blog hop that is showcasing projects using the brand new Butterfly Bouquet.
So make sure you hop around with us, as you will get lots of ideas and inspiration with new set of products.
So let’s get started! shall we?
The Butterfly Bouquet Collection
If you haven’t heard the news, Stampin’ Up! has released a brand new collection of products that is called the Butterfly Bouquet. This collection includes a stamp set and a coordinating die set, as well as 2 brand new paper packs!
You can see below, the images of all the products including in this new collection.. The bundle (stamp + dies) is going to be available in the next catalog, however the paper packs are while supply last! So definitely put them in your wish list!
One of the things you need to know about the bundle is that the stamp set is like a background stamp. Meaning, you stamp all images at once.
But the coolest thing, is that the die to cut out the silhouette of the butterflies is also connected! So you can cut out all the butterflies at once! Making it easier to get plenty of cut out images to decorate your images!!
Similarly the Butterfly Bijou designer series paper, a.k.a. DSP or patterned paper, has a design that includes the same butterflies as the stamp set. Therefore you can cut out all the butterflies in this sheet at once.
If you want to see this collection in full action, watch the video tutorial from this post where I show it in so much detail..
But lets see below how to make a handmade Birthday Card using the Butterfly Bouquet collection.
Handmade Birthday Card with the Butterfly Bouquet
When I am trying to make cards, I try to get an idea of what products to use, as well as a sketch.
The Sketch
Here is the sketch I used. This is the same sketch I have been using during the Card Making Made Easy Workshop this week. In this workshop I’ve been teaching how you can create your own cards using the supplies you already have! (You can watch all the replays in my FB Group if you are interested in this workshop!)
And every day I have been sharing a card using the same sketch!
All card turn out beautiful and sooo different, so that is the fun part of using sketches!
So definitely wanted to share this suite with this sketch!!
As you can see it is a simple sketch, and honestly I think these are the best you can use when starting. Mainly because you can substitute so many things easier and faster.
Once you have the sketch then it is time to see how you want to incorporate it into your cards. So in my case I knew I wanted to use a cool technique for the background using the blending brushes, and I new I wanted to use the gold hoops, plus some of the butterflies from the Butterfly Bouquet collection.
And at this point the next thing to do is to look for the color combination!
The Color Combination
A super effective tip for color combos is to always get it from your DSP or the products you want to use.. this never fails!
Getting the color combo from the products helps me make sure everything is well coordinated and today was not an exception!
I had a butterfly cut out in the pool party/coastal cabana tones, so I instantly knew what colors I wanted to use in the color combo of my card.
Give it a try my friend, specially if you ever struggle getting color combination ideas..
Using the colors from a sheet of DSP that you like will help you get with color combo that cannot fail! Colors will look amazing every single time, as you are seeing them together in that sheet of DSP.
Another tip I can give you to get a nice balance of colors is to look at the amount of color you see in that DSP design.. you can define from that sheet what color should be the main color and which one a highlight color.. it never fails!
Other details of the card
Below the picture of the card I made using the sketch and the Butterfly cut- out. And you can see how I used a technique on the background of my card.
And in this case I wanted to create a cloudy sky using a template I made with the “Happy” dies and the blending brushes! You can watch the video tutorial to learn how to do this cloudy sky background..
Also I really wanted to use the gold hoops as I have not used them ever and had caught my eye in a recent project I saw from a fellow demonstrator..
As a final touch, I added wink of stella to the butterflies.
You can see how I incorporated the elements from the sketch in my card, using sketches is soooo easy and it always helps you get so many card ideas in a quickly way.. so give then a try! I am sure you will enjoy your crafting time so much more!
A sketch is like a road map of what to do, but still gives you flexibility to change things around to make your card in any style you like.. 🙂
Wanna learn more about how to come up with endless card ideas?
If you want to learn more about how to come up with endless card ideas with ease and confidence, using the supplies you already have, then the Card Making 101 Program would be perfect for you...
However, at this time this program is closed..
But in the meantime, I am still offering the FREE Card Making Made Easy Workshop to help you start thinking differently when making your cards..
I promise you this FREE Workshop will help you start coming up with card ideas..
As mentioned before you can check the video tutorial below, where you will see step by step how to make this card! (please scroll to the min 2, as i had some minor issues with the audio)
The Blog Hop Line Up
The Supply List
You can see below the full list of Items I used to make these cards, if you click on the images below it will take you to my online store where you can purchase any of these items. I truly appreciate your continuous support 🥰
Want to remember this post for later? Save these Birthday handmade card Ideas in your favorite board!
Valentine’s is around the corner, and with that in mind I thought to share a couple of Valentine’s projects using the Love you Always Suite. I am sure these ideas will help you when you are planning for your Valentine’s projects.
But even better, this post is part of a blog hop which theme is LOVE!! And in this blog hop my fellow Stampin’ Up! demonstrators will be sharing projects that will inspire you to create your your Valentine’s projects!
So let’s get started!!
Valentine’s projects using the Love You Always Suite
For my projects I decided to showcase the Love You Always Suite, which has two beautiful designer series papers (DSP).
The True Love DSP showcases all designs in black and white. And the Love you Always DSP features monochromatic designs with foil details in Rococo Rose, Sahara Sand, and Blushing Bride.
Both of these designer series papers coordinate beautifully as you will see in both of my projects.
The Color Combination
Once I know which pattern paper I want to use in my projects, then I select a color combination from it. This makes it easy to select the embellishments, and cardstock to use.
For these projects I decided to use the following color combination.
Since the True Love DSP has larger flower images, I decided to use these as my focal point. Plus these would be perfect for coloring them in any color using the alcohol blends.
Following the color combination I selected from the paper pack, I knew I have to color the flowers in Rococo Rose. You can see the flowers in the picture below.
This is why I love Stampin’ Up! products! It is always easy to color coordinate all the elements in my projects. I just need to pick a color and then select inks, embellishments, cardstocks in the same color and everything coordinates!
You can watch the video tutorial below where you can see step by step how I colored these flowers with the stampin’ blends a.k.a. alcohol markers.
I share with you lots of tips on how I use the alcohol markers to have a nice blending with the colors. And as you can see I added wink of stella to the flowers to give it a shimmery look.
Valentine’s Card & Treat Holder
As you can see below, here are my Valentine’s projects.. this is an easy and cute Valentine’s card with a coordinated treat holder.
Both of the sentiments come from the Always in my Heart stamp set. These sentiments are great, as these can be used for so many other occasions and not just Valentine’s, and the font is just really nice. I love when the sentiment mixes different type of fonts, don’t you agree?
For the Treat holder I use the brand new Love You Always treat box, which was really easy to ensemble and even better it does not uses any glue!!! Plus I was surprised with the size as this can fit easily fit about 4-5 chocolate candies.. These boxes are about 4 x 3 x 1.5 inches, so these are great for little party favors!
If you ever struggle on coming up with card ideas, then make sure you read this post where I share with you my 7 step process that helps me every single time!
And if you want to learn even more about how to come up with endless card ideas with ease and confidence, then my Card Making 101 program is perfect for you.. At this time this program is not open, but you can join the waitlist to be first one to know when it opens again.
The Video Tutorial
As usual here is the video tutorial where I share with you how to make these projects step by step so you can make them as well. I go over how to color using the alcohol markers as well as how to put together the card and how to ensemble the treat box.
I share with you all the measurements as well as all the products I used. Additionally at the bottom you will see the full supply list with links to my store in case you need any of these products.. As always I truly appreciate your support! 😁
The Blog Hop Line Up!
And as mentioned at the beginning of this post, this post is part of a Blog Hop to share with you more Love-theme projects with you!! so make sure you visit all participating blogs! I know you will get lots and lots of ideas and inspiration to keep you crafting!
The Supply List
You can see below the full list of Items I used to make these cards, if you click on the images below it will take you to my online store where you can purchase any of these items. I truly appreciate your continuous support 🥰
Want to remember this post for later? Save these Valentine’s Project Ideas in your favorite board!
Receive FREE tutorials to make 5 cards when you sign up!
You have Successfully Subscribed!
Subscribe
Get my new posts in your inbox!
Current Catalogs
Archives
Categories
Disclaimer
The content in this blog is the sole responsibility of Alejandra Gomez as a Stampin’ Up!® Independent Demonstrator. The use of and content of classes, services or products offered is not endorsed by Stampin’ Up!


 If you want to learn more about how to come up with endless card ideas with ease and confidence, using the supplies you already have, then the Card Making 101 Program would be perfect for you...


